The procedure in this topic is for DOVECOT users only, so in other words if said yes to the Dovecot option when you installed the modified version of EHCP force from this site (or converted your installation to Dovecot), also this procedure will only work with the modified version of EHCP force from this site.
If you said no to the Dovecot question at install time, and you want to follow this topic, it is possible to convert your installation to Dovecot, providing you are using the modified version of EHCP force from this site.
If you wish to convert your installation to Dovecot, THIS POST tells you how.
About this topic:
Please be aware that this is probably the longest, and most complex procedure on this website.
I recommend your read through it first, so you know what you’re up against. If your good with Linux this may be easy for you, but if your new to Linux, this topic could be an absolute nightmare.
There is no reason why you could not set up a virtual machine on your Windows PC to practice, using something like VMWare or Virtual Box. If something goes wrong, and your new to Linux, you could find yourself facing a full server re-install, if you cannot work out how to fix it.
It’s a risky business:
Before following this topic think about how much you want this control over Spamassassin, and ask yourself is it worth the hassle, especially if it all goes wrong.
It is all about YOU:
I was thinking about writing a script to do this job, but your feedback suggested it is best not to, as it is good to help new users learn, as this site it for you, I did as I was told and kept it as a manual procedure. Believe it or not, I have simplified this post for Ubuntu 26.04, and Dovecot. This procedure is one of the reasons for making a Dovecot version of EHCP force, as this is never stable on the default email system on EHCP force, hence why you must be running Dovecot to do this.
Sorry, Courier, but you don’t support the sieve protocol.
I am not going to tell you how to do this on Ubuntu 26.04 using the EHCP force Default email system, as I don’t want you to have to deal with an unstable mail system. Modern email systems use something called the sieve protocol, which is required for this topic, however the EHCP default email system (courier), does not support it, meaning that setting this up with courier is always going to be messy and unstable.
About Spamassassin:
As it stands Spamassassin is installed on your server with a spam threshold score of 6.31.
Personally, I recommend a spam threshold of around 4, for best results.
How does Spamassassin arrive at the spam score?
Each email scanned by Spamassassin can go through up to 600 individual tests. All in all, Spamassassin has over 1000 tests available, but not all are used.
Checks run in priority and some checks are skipped if certain other checks succeed or fail. Each check may add or subtract to an email’s score.
This per check score is usually very small, typically between ±0.01 and ±0.5. Some of the more obvious tests will add or subtract 1.0 to 2.5 to an emails score.
As emails gets tested, each test score is added to a running total.
When this total reaches the Spam threshold as set by you, the email is marked as spam.
I personally recommend a spam threshold score of around 3 or 4.
What are we going to do?
In this topic we will give individual email users the option to control Spamassassin for their own requirements direct from Roundcube webmail, as well as greater control of the junk email folder.
This procdeedure will be effectively giving Spamassassin a user interface, and also making it so email users can have customised settings rather than the current global settings.
Now there is a piece of software installed on your server that wants to take away our control over Spamassassin, this software is called Amavisd-New (or just Amavis).
Ok let’s break this down a bit, the name of the actual mail server software is Postfix (and Dovecot), your anti-virus application is called ClamAV and your spam blocking application is called Spamassassin.
Amvis is what is currently interfacing ClamAv and Spamassassin with postfix, almost like a middle man or go between.
I am hope that makes sense.
Now we are unable to give users full control over Spamassassin whilst Amavis is still in the mix (or at least not easily anyway).
So, in order to proceed we would fist need to uninstall Amavis, then Interface Spamassassin directly with postfix, finally install an add-on for ClamAv called ClamAv-Milter to link it back into postfix, all this is to gain control over Spamassassin for individual users.
If that was not enough, we then have to get Spamassassin using a MySQL database for its configuration rather than a file, then we need to install a Roundcube plugin to change and update the Spamassassin configuration within its database at the user’s request.
Finally, to put the icing on the cake, we need to install a couple more Roundcube plugins to make it function a bit more smoothly and use the Junk email folder properly, this will also provide you with the option to set up custom rules or filters, for incoming emails.
This is the order of play. It is safe to take a break between each section.
1. Download an unpack all the support files we need.
2. Create a MySQL database for Spamassassin to use.
3. Configure Spamassassin to use your new database.
4. Uninstall Amavis, Connect Spamassassin and ClamAV back to postfix.
5. Activate DCC for Spamassassin (more on this later).
6. Configure Dovecot
7. Install the Roundcube plugins.
7. Testing, using and final notes.
Ok only if you are sure, let’s get started.
Part 1-- Download an unpack all the support files we need.
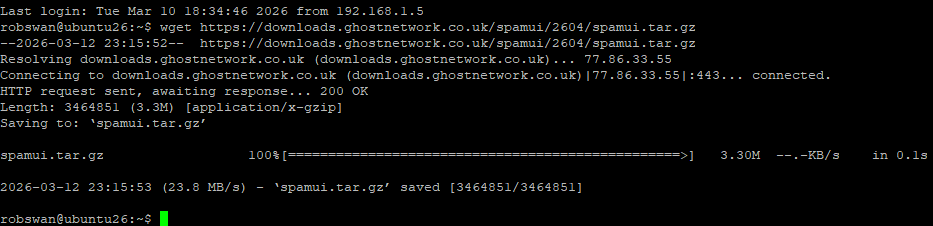
Connect to your server using you PC and PuTTY, and issue this command to download the support file package.
wget https://downloads.ghostnetwork.co.uk/spamui/2604/spamui.tar.gz
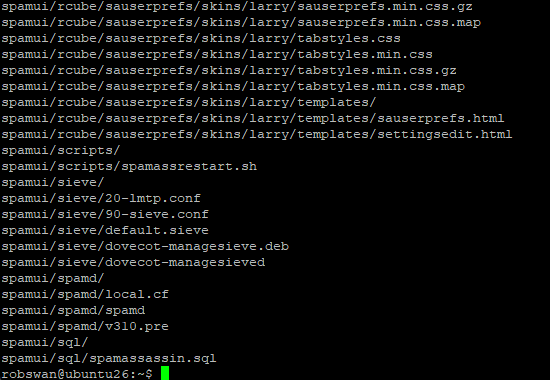
Next, unpack the files using this command.
tar -zxvf spamui.tar.gz
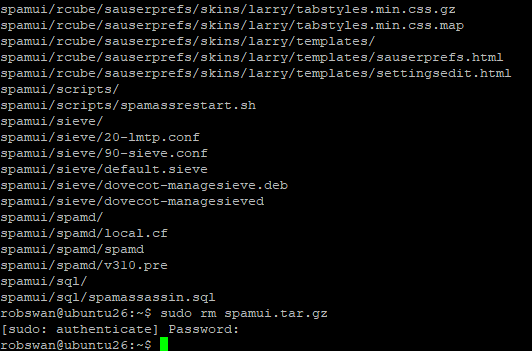
Where it is not totally necessary, if you want you can delete the downloaded file using this command.
sudo rm spamui.tar.gz
Ok, that is the first bit done.
Part 2 -- Create a MySQL database for Spamassassin to use.
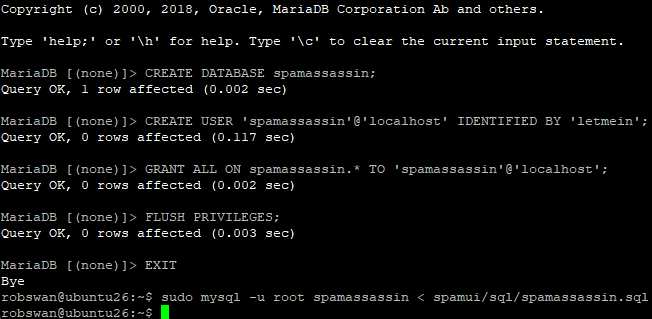
First, we are going to create a new MySQL database called “spamassassin” we are going to create a new MySQL user also called “spamassassin” for Spamassassin and Roundcube to use in order to access the new database.
Before we begin, make up a new password for the new “spamassassin” user.
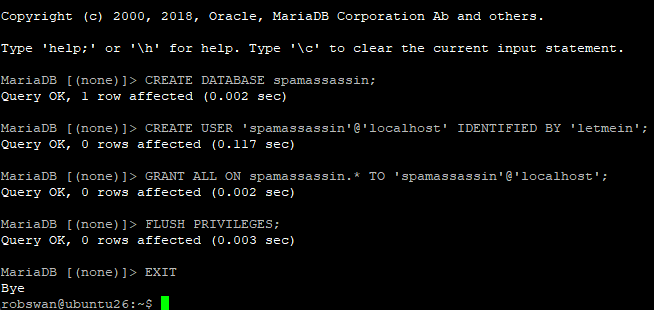
OK then, log into your server with PuTTY and issue this command to log into MySQL.
sudo mysql -u root
Then enter this command to create the new database.
CREATE DATABASE spamassassin;
Next issue this command replacing My-Password with your new password for user “spamassassin” that you made up.
CREATE USER 'spamassassin'@'localhost' IDENTIFIED BY 'My-Password';
Next enter this command.
GRANT ALL ON spamassassin.* TO 'spamassassin'@'localhost';
And finally these two commands.
FLUSH PRIVILEGES;
EXIT
Next, issue this command, to populate our new Spamassassin database.
sudo mysql -u root spamassassin < spamui/sql/spamassassin.sql
Ok, that is the this bit done.
Part 3 -- Configure Spamassassin to use your new database.
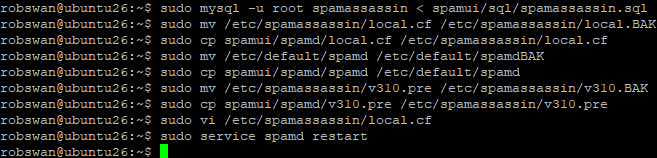
Ok, issue these commands one by one to copy in some our new support files for Spamassassin.
sudo mv /etc/spamassassin/local.cf /etc/spamassassin/local.BAK
sudo cp spamui/spamd/local.cf /etc/spamassassin/local.cf
sudo mv /etc/default/spamd /etc/default/spamdBAK
sudo cp spamui/spamd/spamd /etc/default/spamd
sudo mv /etc/spamassassin/v310.pre /etc/spamassassin/v310.BAK
sudo cp spamui/spamd/v310.pre /etc/spamassassin/v310.pre
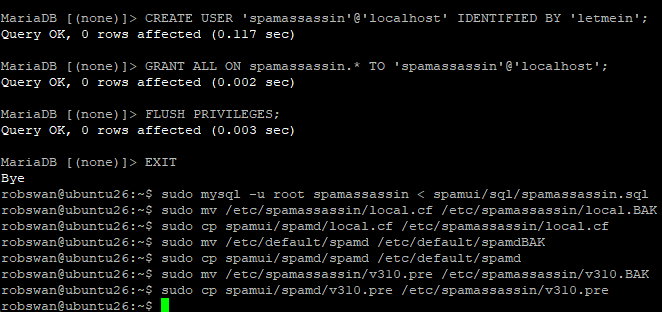
Note: We also backed up all of the original files, as a precaution.
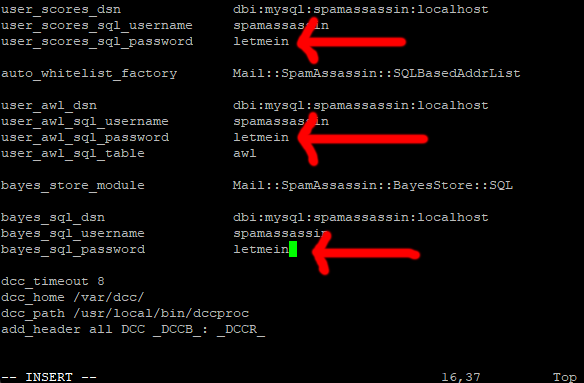
Next issue this command to edit our new main Spamassassin configuration file.
sudo vi /etc/spamassassin/local.cf
The first job is to add our new MySQL Spamassassin user password that we made up.
Press I for insert and change My-Password on lines 3, 9 and 16, make sure you keep the original spacing, so if your password was for example letmein it would look something like this.
Ok, next scroll down to line 35, which should say:
report_contact https://www.MyDomain.com
Please change MyDomain.com, to your actual domain name.
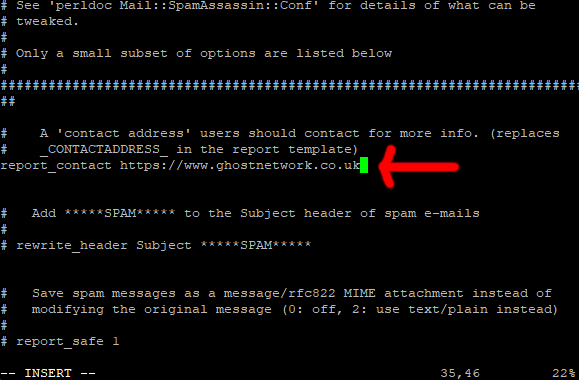
This line is technically supposed to be an email address, and not a website address, but I find it looks better if we just give a website address. As always, it’s your call.
Ok save and exit the file (Esc :w (enter) :q (enter).
Ok, now please restart Spamassassin, using this command.
sudo service spamd restart
Ok let’s just check we are connected, issue this command.
sudo service spamd status
You may need to make your PuTTY windows wider to check this.
All going well you should see something that looks a bit like this.
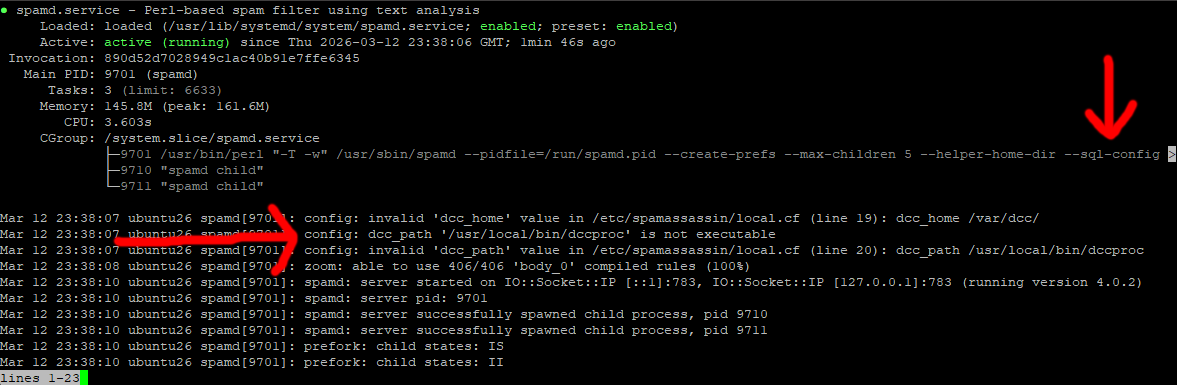
If the prompt (green cursor) does not return, press ctrl+z.
The errors you see relating to DCC, just mean we have not installed it yet, we will do this later in the topic.
OK we now have Spamassassin using a MySQL database.
There may be a small issue next time you reboot your server, by which Spamassassin tries to connect to your database before the MySQL service has fully started, which can cause an error. Don’t worry about this now as will fix this a bit later in this topic.
Part 4 -- Uninstall Amavis, Connect Spamassassin and ClamAV back to postfix.
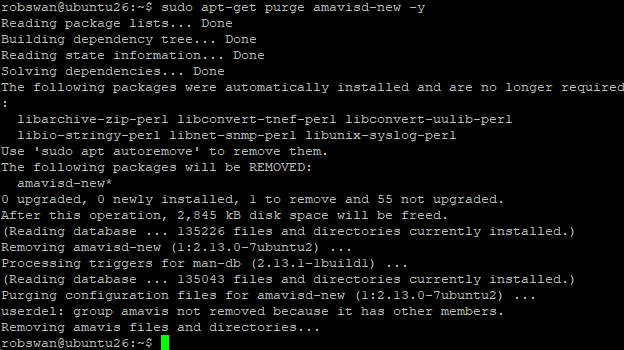
Ok, uninstalling Amavis, can be done using this command.
sudo apt-get purge amavisd-new -y
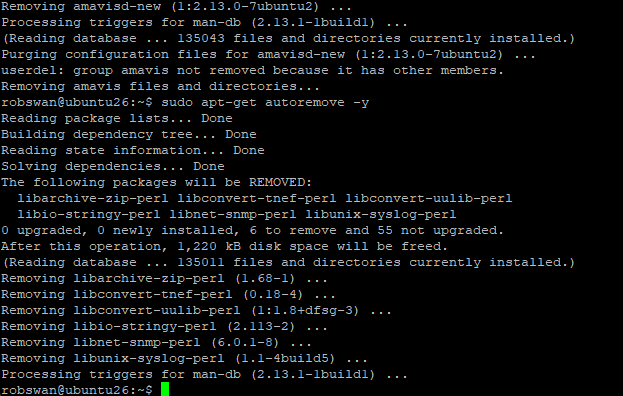
Just to clean up any unwanted dependencies for Amavis, please next issue this command.
sudo apt-get autoremove -y
TIP: We are about to edit the two main Postfix configuration files, there is no reason why you cannot take a backup first, before we edit the files. So, you could issue these commands sudo cp /etc/postfix/master.cf /etc/postfix/master.cfBAK and then sudo cp /etc/postfix/main.cf /etc/postfix/main.cfBAK, to do so. In the event that you have an issue, you could restore the files using these commands sudo cp /etc/postfix/master.cfBAK /etc/postfix/master.cf and sudo cp /etc/postfix/master.cfBAK /etc/postfix/master.cf. if you do have to restore backup files, you must restart Postfix afterwords using sudo service postfix restart.
Ok, next we need to connect Spamassassin directly to postfix.
Issue this command.
sudo vi /etc/postfix/master.cf
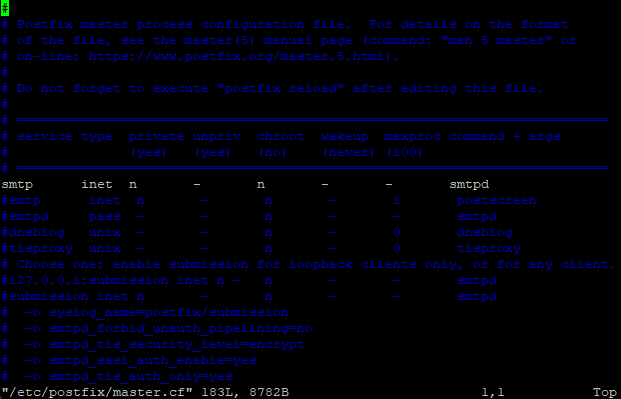
Find the line in the file that looks like this.
smtp inet n - y - - smtpd
It should be about line number 12
Press I for insert and insert this line under it.
-o content_filter=spamassassin
Put 2 spaces before the new line so it looks like this.
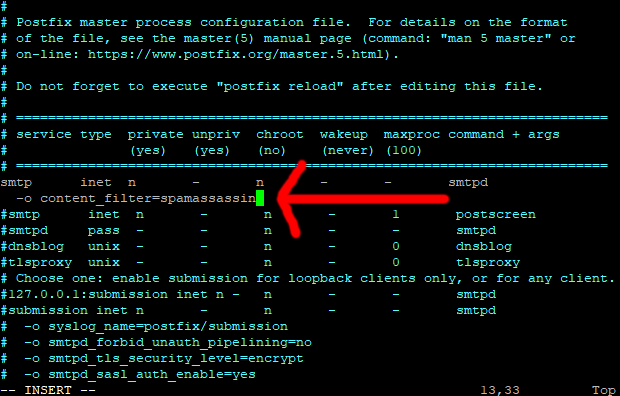
Next Scroll down through the file until you find this section.
smtp-amavis unix - - - - 2 smtp
-o smtp_data_done_timeout=1200
-o smtp_send_xforward_command=yes
-o disable_dns_lookups=yes
-o max_use=20
It should start around line 160 ish.
Please carefully, add a # to the beginning of each of the lines mentioned above, to comment them out.
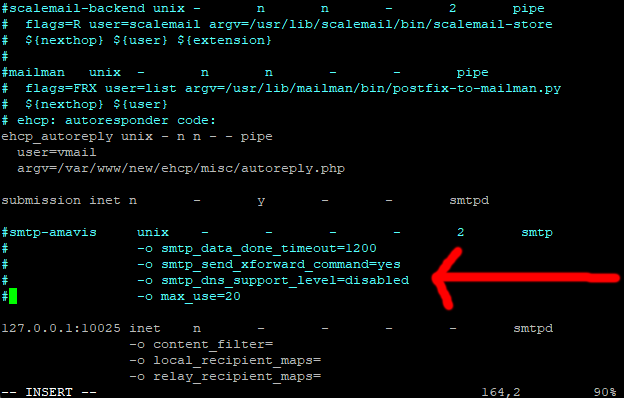
Next, move to the end of the section we just commented out, press enter to create a line space and paste in this code.
Code: Select all
spamassassin unix -     n       n       -       -       pipe
        user=nobody argv=/usr/bin/spamc -u ${recipient} -e
        /usr/sbin/sendmail -oi -f ${sender} ${recipient}
Ok Save and exit the file (Esc :w (enter) :q (enter))
Next issue this command.
sudo vi /etc/postfix/main.cf
Move to the end of the file, and the last line should say:
content_filter = smtp-amavis:[127.0.0.1]:10024
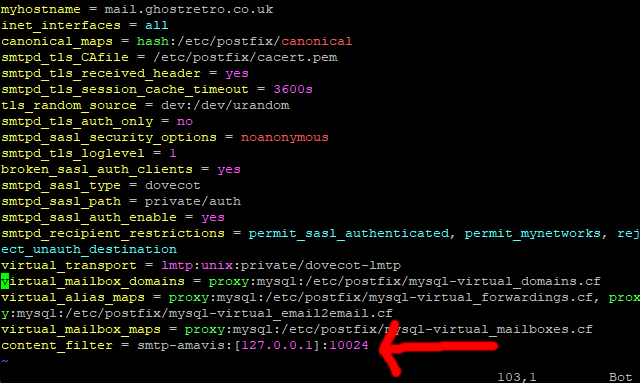
Press I for insert, and move your cursor one space past the end of the line.
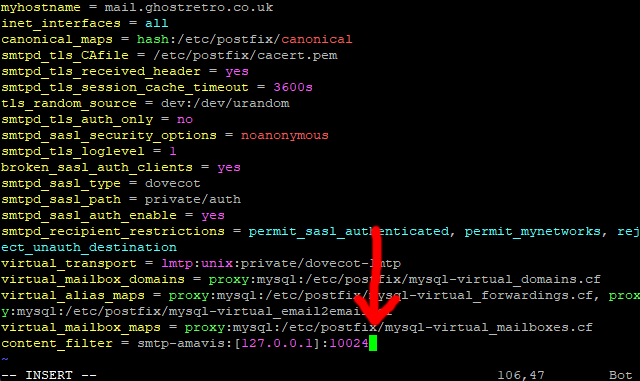
Now, carefully delete the line.
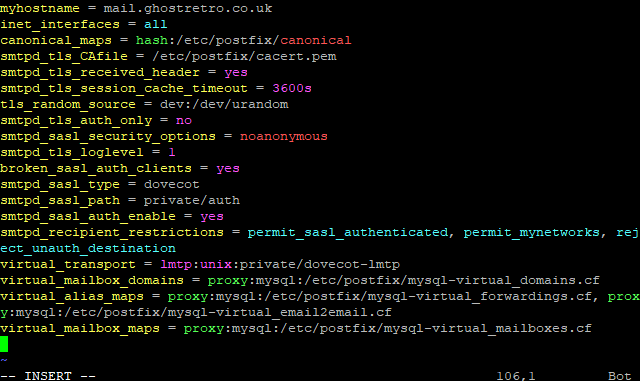
Ok Save and exit the file (Esc :w (enter) :q (enter))
Now restart both postfix and Spamassassin, to do this use these commands (one by one).
sudo service spamd restart
sudo service postfix restart
Ok, this next command is VERY IMPORTANT, as EHCP could potentially undue the changes we have made to /etc/postfix/master.cf if we don’t issue it, so please issue this command.
sudo cp /etc/postfix/master.cf /etc/postfix/master.fix

In case you were wondering the master.fix file is what EHCP force uses to repair postfix in the event of an issue. We will do the same thing with /etc/postfix/main.cf a bit later, just in case you were wondering.
That should be Spamassassin hooked back up, it’s just remains to do ClamAV.
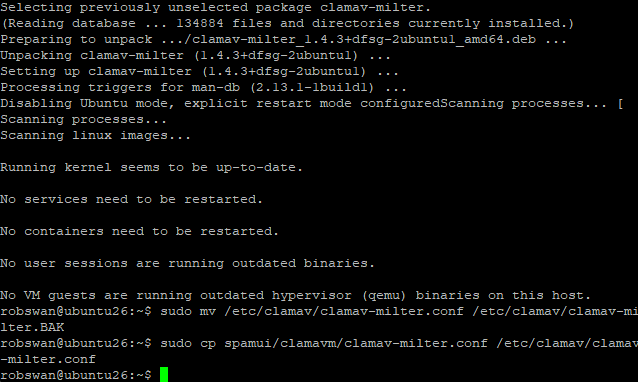
First we need to install Clamav milter, by using this command.
sudo apt-get install clamav-milter
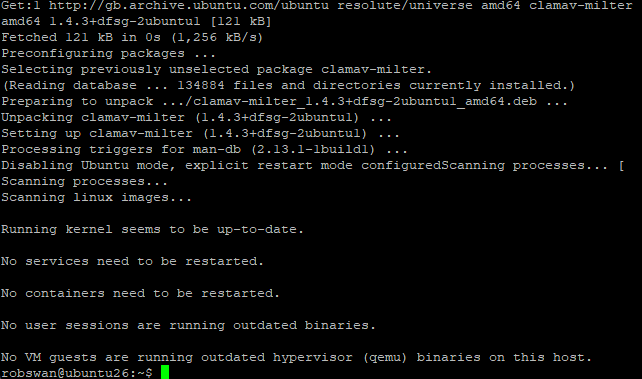
When the install is complete, we just need to configure it.
We can do this simply by copying in our next support file, so issue these commands one by one to do so.
sudo mv /etc/clamav/clamav-milter.conf /etc/clamav/clamav-milter.BAK
sudo cp spamui/clamavm/clamav-milter.conf /etc/clamav/clamav-milter.conf
All that remains is to link ClamAV to postfix VIA ClamAv Milter and then restart the services.
Ok, we need to open another postfix configuration file.
sudo vi /etc/postfix/main.cf
scroll down to the end of the file, press I for insert and paste this code in.
Code: Select all
# virus scanning
smtpd_milters = unix:/var/spool/postfix/clamav/clamav-milter.ctl
milter_default_action = accept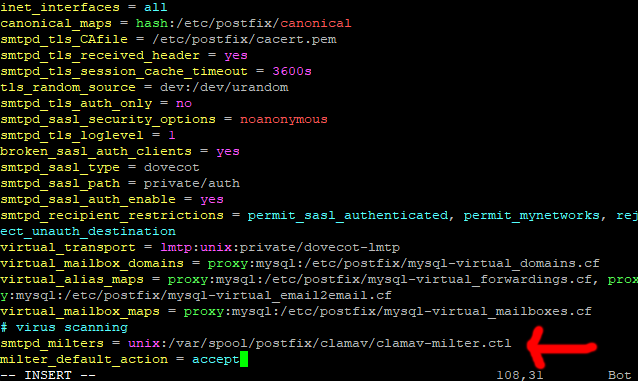
As per normal save and exit (Esc :w (enter) :q (enter))
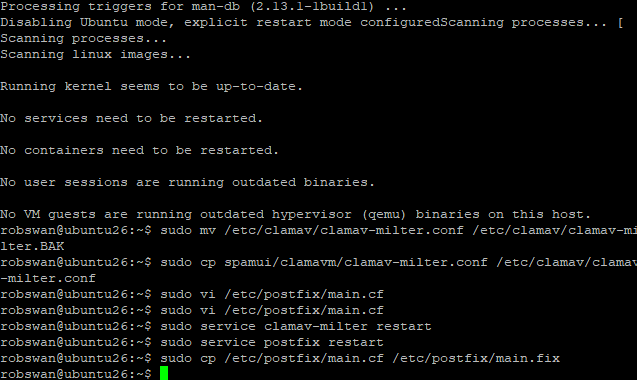
Now restart the services with these commands.
sudo service clamav-milter restart
sudo service postfix restart
Ok, this next command is VERY IMPORTANT, as EHCP could potentially undue the changes we have made to the above file if we don’t issue it, so please issue this command.
sudo cp /etc/postfix/main.cf /etc/postfix/main.fix
In case you were wondering the main.fix file is what EHCP force uses to repair postfix in the event of an issue, as we mentioned earlier.
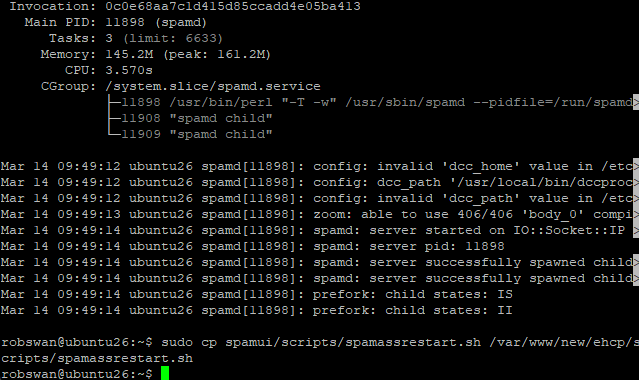
Ok it’s probably a good time to check all the services to make sure all is ok, you can do this by requesting the status of each of them using these commands.
You can use CTRL + C to close each of the status windows, if the prompt does not return.
sudo service clamav-daemon status
sudo service clamav-milter status
sudo service postfix status
sudo service spamd status
Cast your mind back to part 3, when we connected Spamassassin to a MySQL database, and we said that after a reboot, it may not be able to find the MySQL service, well we are going to fix that right now.
Issue this command to copy in yet another of our support files.
sudo cp spamui/scripts/spamassrestart.sh /var/www/new/ehcp/scripts/spamassrestart.sh
The script file we just copied across fixes the above issue, however we need it to run when the server reboots, so we can add it to the crontab file in order to achieve this.
Please issue this command.
sudo crontab -e
Press I for insert and add this line at the end.
#RESTART SPAMASSASSIN AFTER 3 MINS
@reboot /var/www/new/ehcp/scripts/spamassrestart.sh >/dev/null 2>&1
Make sure you don’t accidentally add any line spaces, as this will stop the crontab file from working.
So the file should look something like this.
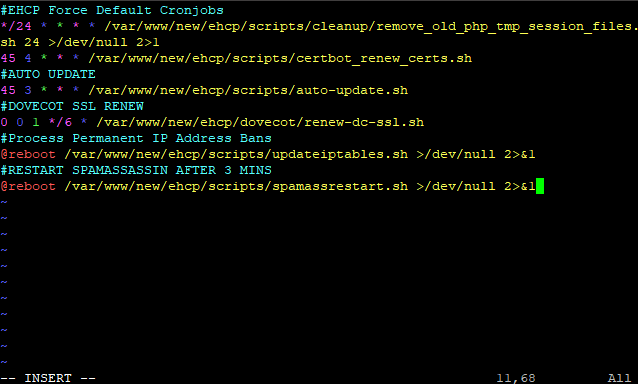
Save and exit (Esc :w (enter) :q (enter))
Now we are done with this part!
Part 5 -- Activate DCC for Spamassassin.
The DCC or Distributed Checksum Clearinghouse is a system of servers collecting and counting checksums of millions of mail messages. The counts can be used by Spamassassin to detect and reject or filter spam.
Change into root user mode with this command.
sudo su
Next issue this command to copy across DCC from the support files.
cp spamui/dcc/dcc.tar.Z dcc.tar.Z

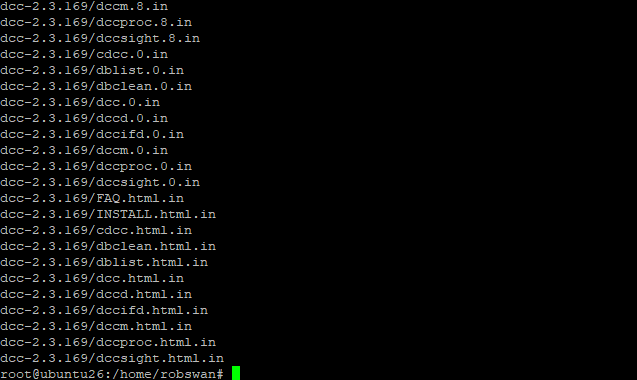
Next issue this command to unpack DCC
tar xzvf dcc.tar.Z
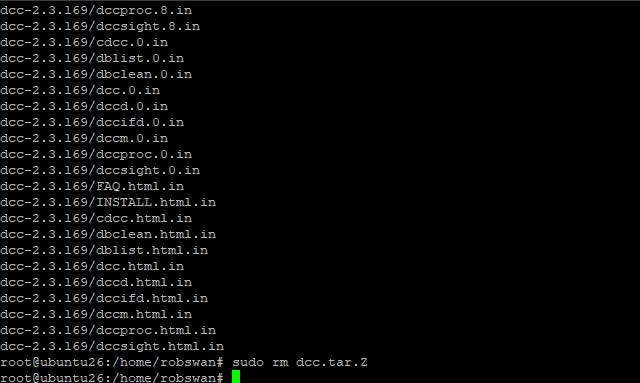
Now DCC is unpacked we can delete the file we copied in using this command.
sudo rm dcc.tar.Z
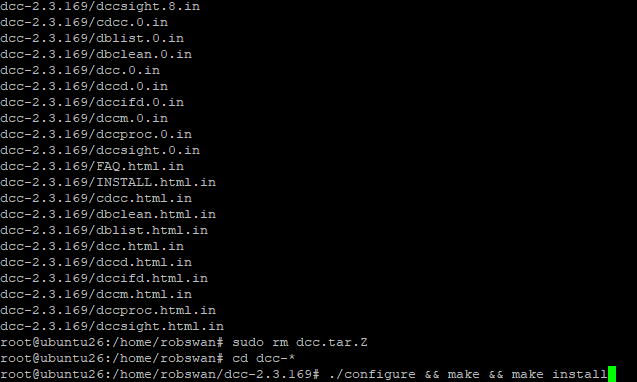
Next, change into the unpacked DCC directory.
cd dcc-*
Ok before we run the DCC setup command, just be aware that it will all look a little odd, as we are going to do something called compiling from source, as DCC cannot be installed via apt-get. Don’t worry though we can do it in one simple command, so issue this command to setup DCC.
./configure && make && make install

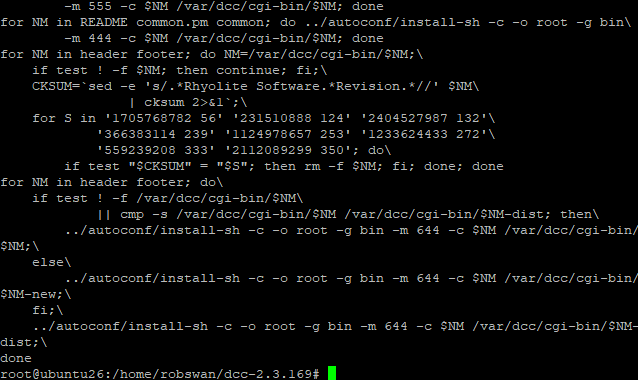
Once the install completes, you can now delete the DCC installer, and come out of root user mode.
Enter these commands to do the above.
cd ..
rm -R dcc-*
exit
We are done for this part.
Part 6 -- Configure Dovecot.
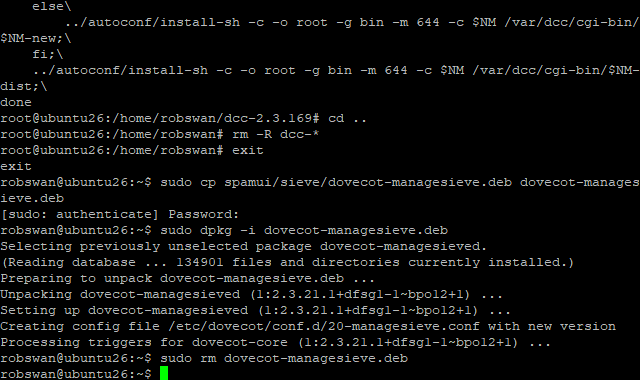
The first job we need to do is install, an addon for Dovecot.
Enter these three commands in turn to do so.
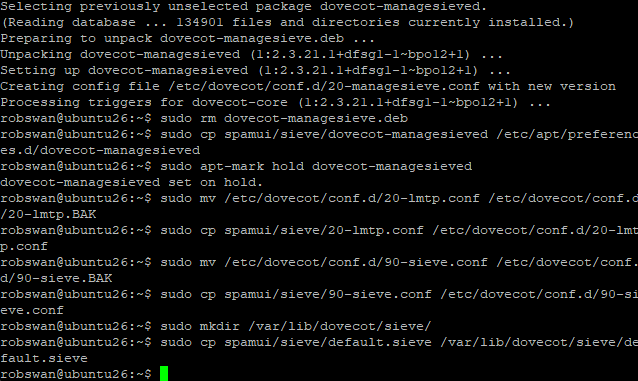
sudo cp spamui/sieve/dovecot-managesieve.deb dovecot-managesieve.deb
sudo dpkg -i dovecot-managesieve.deb
sudo rm dovecot-managesieve.deb
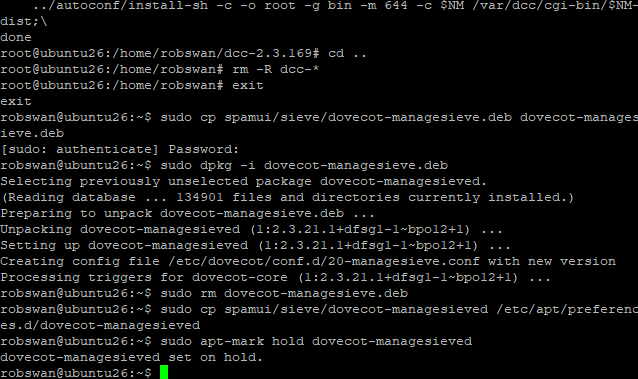
No, we need to do a little bit of housekeeping for the package.
Issue these two command the do the housekeeping
sudo cp spamui/sieve/dovecot-managesieved /etc/apt/preferences.d/dovecot-managesieved
sudo apt-mark hold dovecot-managesieved
We now need to copy over some more of our support files, so issue these commands to do so.
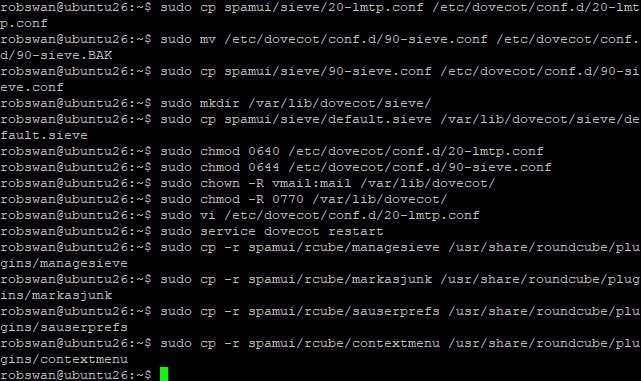
sudo mv /etc/dovecot/conf.d/20-lmtp.conf /etc/dovecot/conf.d/20-lmtp.BAK
sudo cp spamui/sieve/20-lmtp.conf /etc/dovecot/conf.d/20-lmtp.conf
sudo mv /etc/dovecot/conf.d/90-sieve.conf /etc/dovecot/conf.d/90-sieve.BAK
sudo cp spamui/sieve/90-sieve.conf /etc/dovecot/conf.d/90-sieve.conf
sudo mkdir /var/lib/dovecot/sieve/
sudo cp spamui/sieve/default.sieve /var/lib/dovecot/sieve/default.sieve
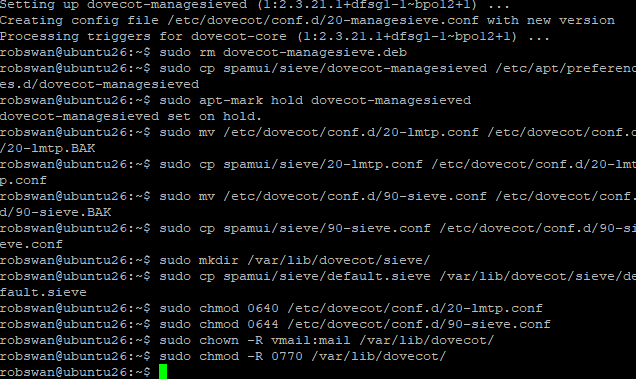
Next, we need to set the correct permission for the files, so issue these commands to do so.
sudo chmod 0640 /etc/dovecot/conf.d/20-lmtp.conf
sudo chmod 0644 /etc/dovecot/conf.d/90-sieve.conf
sudo chown -R vmail:mail /var/lib/dovecot/
sudo chmod -R 0770 /var/lib/dovecot/
Ok, out of these files only one need editing, to add your postmaster email address.
So, issue this command, to open the file.
sudo vi /etc/dovecot/conf.d/20-lmtp.conf
Move down to line 38, press I for insert and change postmaster@mydomain.com, to your postmaster email address.
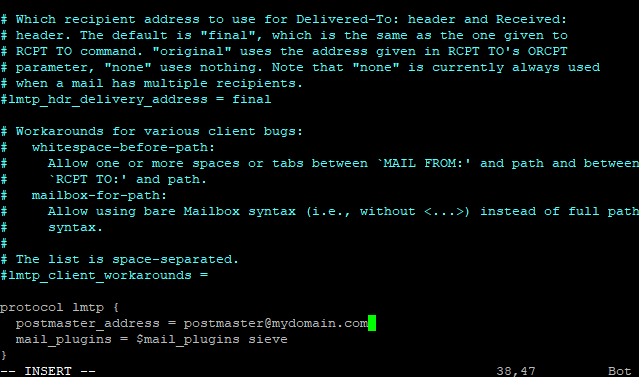
As per normal save and exit (Esc :w (enter) :q (enter))
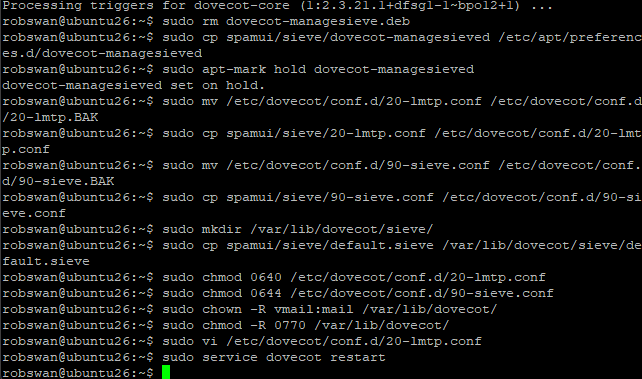
Finally restart Dovecot using this command.
sudo service dovecot restart
Ok, we are done with this part.
Part 7 -- Install the Roundcube plugins.
Yes, you guessed it we need to copy some more files in, so issue these commands to do so.
sudo cp -r spamui/rcube/managesieve /usr/share/roundcube/plugins/managesieve
sudo cp -r spamui/rcube/markasjunk /usr/share/roundcube/plugins/markasjunk
sudo cp -r spamui/rcube/sauserprefs /usr/share/roundcube/plugins/sauserprefs
sudo cp -r spamui/rcube/contextmenu /usr/share/roundcube/plugins/contextmenu
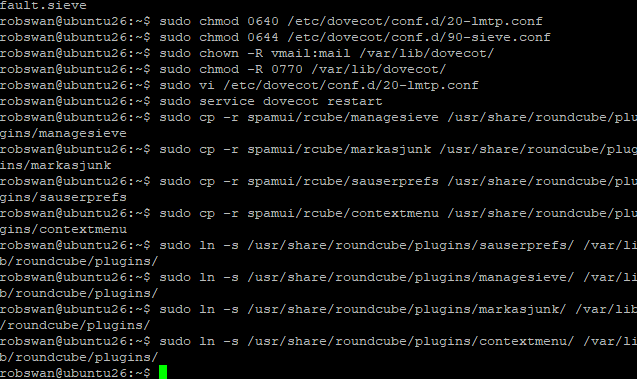
Next, please enter these commands, to create some important symlinks.
sudo ln -s /usr/share/roundcube/plugins/sauserprefs/ /var/lib/roundcube/plugins/
sudo ln -s /usr/share/roundcube/plugins/managesieve/ /var/lib/roundcube/plugins/
sudo ln -s /usr/share/roundcube/plugins/markasjunk/ /var/lib/roundcube/plugins/
sudo ln -s /usr/share/roundcube/plugins/contextmenu/ /var/lib/roundcube/plugins/
Ok, now we need to give one of the plugins your spamassassin MySQL user password, that you made up in Part 2.
So, issue this command to open the file.
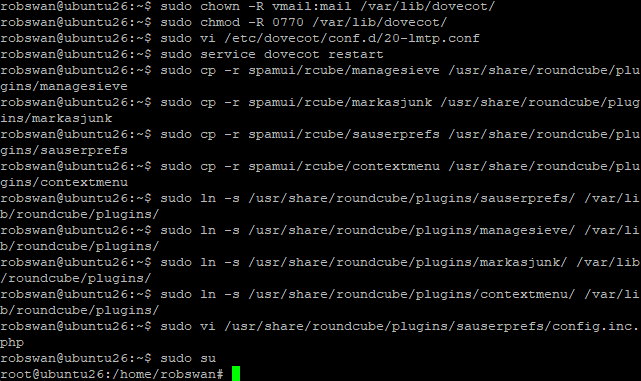
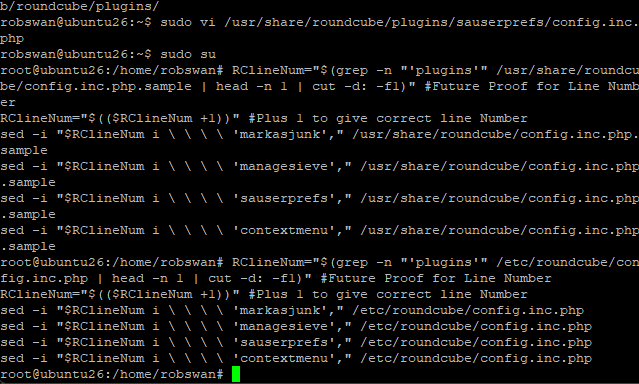
sudo vi /usr/share/roundcube/plugins/sauserprefs/config.inc.php
Move down to line 10, press I for insert and carefully change My-Password, to your actual spamassassin MySQL user password.
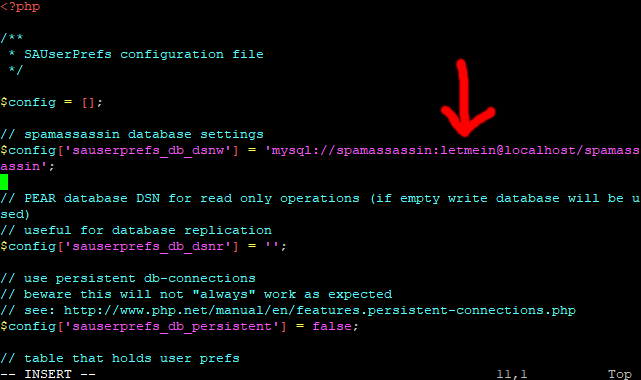
As per normal save and exit (Esc :w (enter) :q (enter))
We are getting near to the end of this massive procedure now, you will be pleased to know.
Ok, we need to activate our Roundcube plugins, but due to us using a custom setup we need to activate them in two files, rather than the usual one.
Ok the first fille is not normally edited, but in our case, we need to.
We are going to use a little bit of code to edit the above file, to save a bit of time.
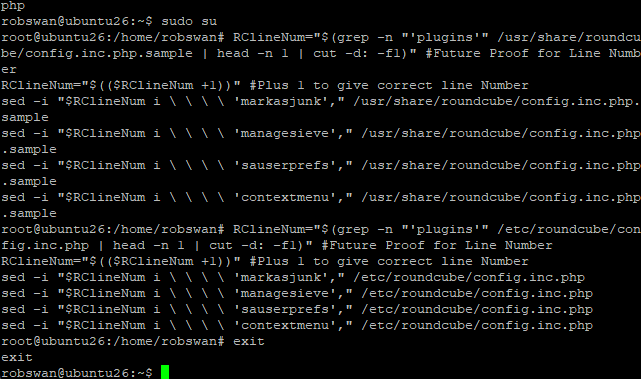
Change into root user mode, using this command.
sudo su
Next, paste in this code, then press enter to run it.
Code: Select all
RClineNum="$(grep -n "'plugins'" /usr/share/roundcube/config.inc.php.sample | head -n 1 | cut -d: -f1)" #Future Proof for Line Number
RClineNum="$(($RClineNum +1))" #Plus 1 to give correct line Number
sed -i "$RClineNum i \ \ \ \ 'markasjunk'," /usr/share/roundcube/config.inc.php.sample
sed -i "$RClineNum i \ \ \ \ 'managesieve'," /usr/share/roundcube/config.inc.php.sample
sed -i "$RClineNum i \ \ \ \ 'sauserprefs'," /usr/share/roundcube/config.inc.php.sample
sed -i "$RClineNum i \ \ \ \ 'contextmenu'," /usr/share/roundcube/config.inc.php.sample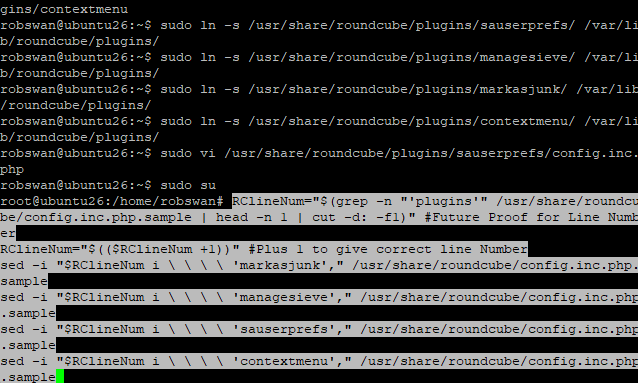
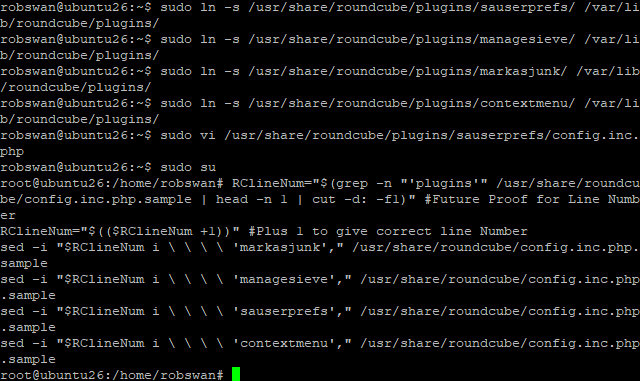
Ok, staying in root user mode, let run some more code to do the main Roundcube config file.
So, paste in this code and press enter.
Code: Select all
RClineNum="$(grep -n "'plugins'" /etc/roundcube/config.inc.php | head -n 1 | cut -d: -f1)" #Future Proof for Line Number
RClineNum="$(($RClineNum +1))" #Plus 1 to give correct line Number
sed -i "$RClineNum i \ \ \ \ 'markasjunk'," /etc/roundcube/config.inc.php
sed -i "$RClineNum i \ \ \ \ 'managesieve'," /etc/roundcube/config.inc.php
sed -i "$RClineNum i \ \ \ \ 'sauserprefs'," /etc/roundcube/config.inc.php
sed -i "$RClineNum i \ \ \ \ 'contextmenu'," /etc/roundcube/config.inc.php 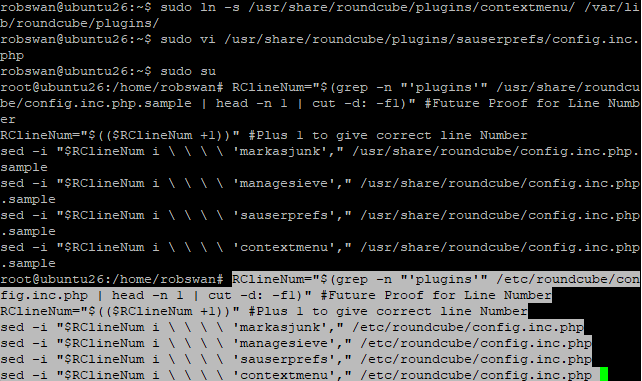
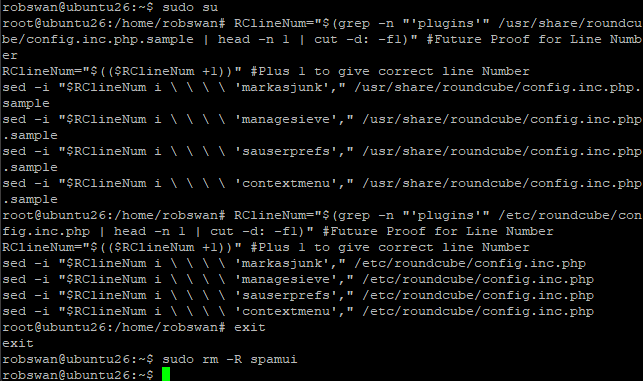
You can now come out of root user mode using the exit command.
Ok, lets get rid of the support package files, to clean up the file system.
Please issue this command to delete the files.
sudo rm -R spamui
Finally, reboot your server using the normal command (sudo shutdown -r now).
Ok, that should finally be the main procedure completed, just testing remains to be done.
Part 7 -- Testing, using and final notes.
Ok, send an email to one of your server email addresses from an email account not hosted on your server.
Log into Roundcube webmail (on your server) with the account that you sent the email to.
Open the email that you sent once it has been received.
At the top right hand side of the email click the little down arrow to display the email header code.
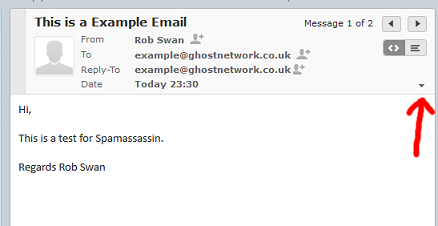
Look for this line
X-Spam-Checker-Version:
It should have next to it something along the lines of.
SpamAssassin 4.0.2 (2025-08-27) on web-server
This tells us that Spamassassin is working and it has looked at this email.
Next, look for this line.
X-Spam-Status:
It should have something like this next to it.
No, score=3.9 required=4.0 tests=DKIM_SIGNED,DKIM_VALID,
DKIM_VALID_AU,DMARC_MISSING,HTML_FONT_SIZE_HUGE,HTML_IMAGE_RATIO_02,
HTML_MESSAGE,RCVD_IN_VALIDITY_CERTIFIED_BLOCKED,
RCVD_IN_VALIDITY_RPBL_BLOCKED,RCVD_IN_VALIDITY_SAFE_BLOCKED,
SPF_HELO_NONE,URIBL_GREY autolearn=no autolearn_force=no version=4.0.
It’s this bit we are most concerned with.
No, score=3.9 required=4.0
This is telling us that this email has a spam score of 3.9 which means it is not seen as spam, in order to be spam it would need a score of 4.00 or above.
You may see something like this.
X-Spam-DCC:
It may have something like this next to it.
www.nova53.net: web-server 1204; Body=1 Fuz1=1 Fuz2=1
This is just telling us that DCC, checked the email.
You may also see in the header this line which may be blank, this is normal.
X-Spam-Level:
Next just scroll down to the lower part of the header to see if the email was virus scanned.
You should see something along the lines of:
X-Virus-Status: Clean
X-Virus-Scanned: clamav-milter 1.4.3 at web-server
Ok, if you have all that (or similar) in the header we are all working (so far anyway).
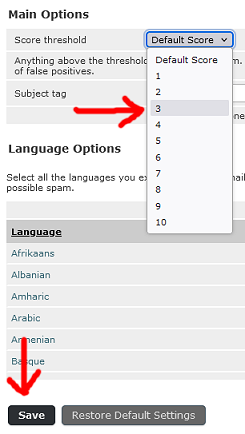
Ok, the default required spam score is set to 4.00, but say this particular user wanted his spam required spam score set to 3.0, this is how they would do it.
Click on settings (top right)

Then Junk (or Spam) then General settings.
In the drop down next to Score threshold change the setting to 3
Next click save.
Next send yourself another email, and this time in the header MAY say something like, asuming the emails spam score was under 3.00.
X-Spam-Status: No, score=0.5 required=3.0
In another example, it coud say something like.
X-Spam-Status: Yes, score=3.9 required=3.0
Meaning that it would have been treated as spam, and moved into the Junk (or Spam) email folder automatically.
Ok, say the user wanted to blacklist an email address (tell spamassassin that all mails from this address should be treated as spam).
Go back to settings, then Junk (or Spam), then Address Rules.
From the drop down box select Reject Mail From, then in the box add the email address that you are sending test mails form (we can undo this later) and then click add rule.
Finally click Save.
Now send yourself another test email and examine the header code (will be in the Junk or Spam folder), and notice what is in the subject line.

You may see something like this in the header.
X-Spam-Flag: YES
X-Spam-Status: Yes, score=99.2 required=3.0
X-Spam-Level: **************************************************
You may also notice the actual message is different also!

Now go back to your Junk (or spam) settings and delete your email address from the list of rejected email addresses (click save).
Ok next, send yourself one last test email.
With the email highlighted click the Junk (or Spam) button at the top.
TIP: You can allso right click on the email and select Junk (or Spam), to perform the same function.

The email will be moved to the Spam folder and also added the Spamassassin rejected senders list just like the above.
To undo this, go to the junk (or Spam) folder and select the relevant message, click not Not Junk (or Not Spam), the email will be moved back to the Inbox and also removed from the Spamassassin rejected senders list, and added to the Spamassassin accepted senders list (white list).
TIP: You can allso right click on the email and select Not Junk (or Not Spam), to perform the same function.
So if you have told Roundcube that an email is junk (or spam) with the toolbar button, it will be marked as Junk (or spam), and moved to the Junk folder.
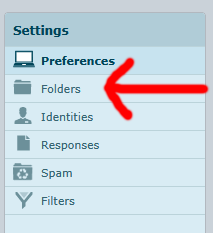
Now, say you wanted email form John Smith, to go into the John Smith folder automatically, we can create a filter rule to do so.
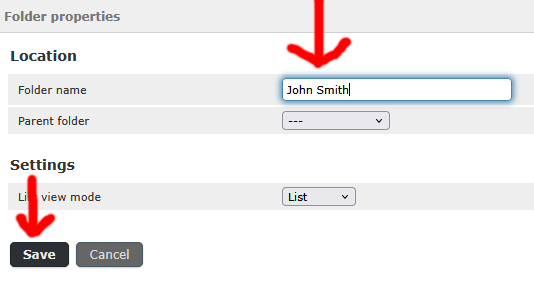
So, first we need to create a folder called John Smith.
To do that go to settings (at the top right), then folders then click the + button at the bottom of the folder list.
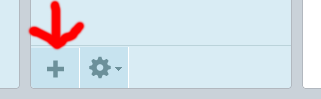
Give your folder a name, and then click Save
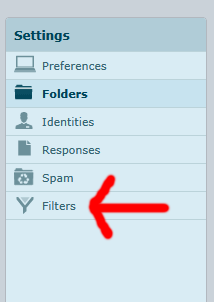
Next, (from within settings, select Filters (from the lefthand column).
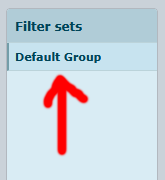
Then Select, Default Group form the next column.
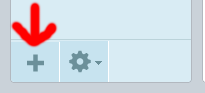
Then at the bottom of the third column (with the heading Filters) click the + button.
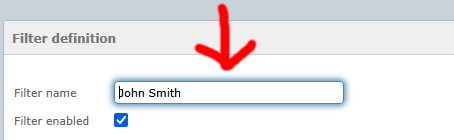
Ok, give the filter a name, for example John Smith.
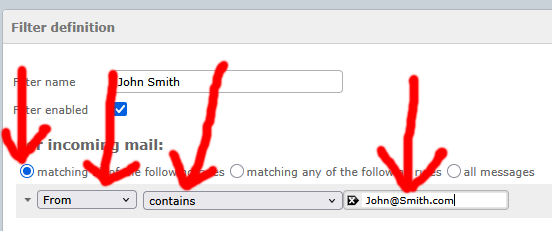
Optionally, you can select the “matching all of the following rules” setting.
Change the first drop down box to from, the next one should be set to contains, and in the final box, type John Smiths email address into the box.
Next under “...execute the following actions:”
In the first drop down box, select Move messages to, and then in the other drop down box, select the John Smith folder. Then click Save.
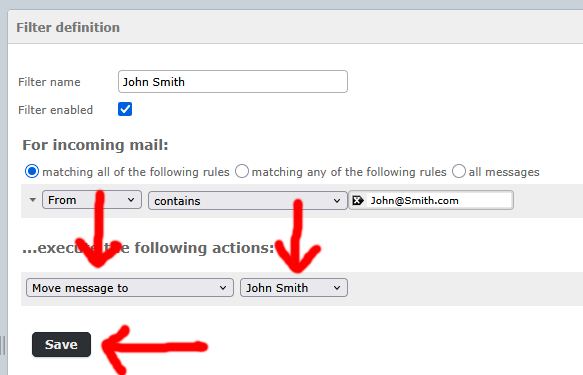
So, with this set, if an email arrives from John Smith, it wont go into the Inbox, it will go into the John Smith Folder.
Now have a play with all the stetting so you get used to it, there is more options than I have mentioned above, so have fun.
And Finally WE ARE DONE!